


Blog
Realtek HD Audio Manager Missing- Fixing Guide
Nowadays, many Windows computers are there, which still ship with Realtek HD Audio Manager. On the other hand, Intel has already improved the High Definition of Audio codecs. Realtek mainly creates integrated sound cards on Windows PCs. These can give you a better sound output. Recently, we are getting a error report that Realtek HD Audio Manager missing from Windows 10. You can’t see it in either the system tray or in the Control Panel. A few users are there who pointed this issue to Windows 10 update.
Here, we have given the process to let you know how to fix the Realtek HD Audio Manager missing problem on Windows 10.
What is Realtek High Definition Audio Manager
The Realtek HD Audio Driver offers high-quality DTS, Dolby, and Surround Sound. The driver Software contains multiple features and functionalities. For example, it comes with a six-channel Digital to Analog Converter (DAC). The converter is compatible with the 16/20/24-bit Pulse Code Modulation format. It supports 5.1 channel audio. You need the driver for your audio device to be in working condition. The new audio drivers came to the market before the release of Windows 10.
Features
It allows you to access the manager from the bottom right corner of the PC. It is available next to the time and date display. Here, you need to right-click on the orange sound icon. It permits you to access all sound tools such as Sound Manager, Audio Devices, Windows Media Player, Volume Control, System Sound Events, and Sound Recorder.
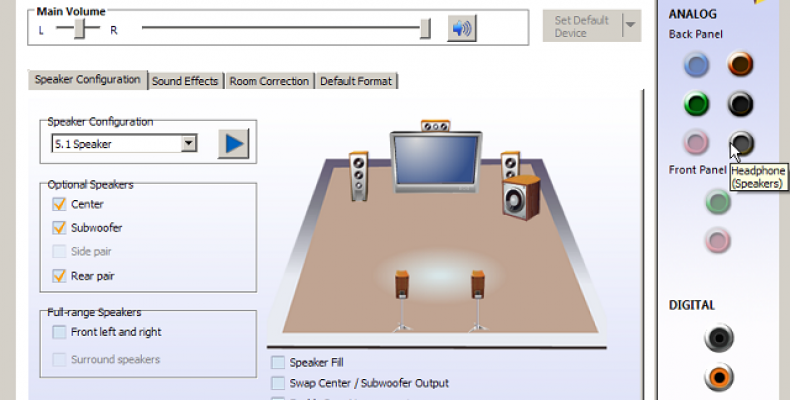
This one enables you to select the speaker configuration as you prefer.
Even, it allows you to choose between 5.1 Speaker, Quadraphonic, and Stereo. But it is when you have the set-up.
You can disable and enable specific speakers with the help of the Speaker Configuration tab. It comes with extra components like Speaker Fill, Swap Center/ Subwoofer Output, and Enable Bass Management.
It has a sound test button as well as a volume control section. You can get it available in the Speakers tab.
It comes with a Room Correction tab, which allows you to adjust the volume manually on each speaker.
Besides, it has a Default Format tab that enables you to change the sound quality.
This Audio Manager allows you to adjust the microphone volume in the Microphone tab. This one comes with extra instruments like Noise Suppression and Acoustic Echo Cancellation.
When you install the Audio driver, the software comes on your PC automatically. It allows you to install from the system tray. You only need to double-click on the Speaker icon. However, if you want, you can launch it from the Program Files location. You can use two tabs to boost up PC sound— Speakers and Microphones.
1] Speakers Tab
Speakers tab allows you to modulate the speaker-related settings on your computer. This tab enables you to adjust the system volume. There is a slider that helps to balance the left-right speaker audio output. The mute button allows you to muffle up the speakers.
Speaker Configuration
The tab enables you to test the stereo output of the headphones or speaker. As soon as you tap on the play button, both left and right speaker output will be tasted by playing a sample audio clip.
Sound Effects
This sound effects option will provide you a list of Environment effects. These effects help to decrease perceived volume differences. Therefore, you can select your desired one from the various options for intensifying speakers or headphones with mind-grabbing environmental effects. If you want, you can use a native Equalizer.
Default Format
The tab enables you to choose the default sound quality depending on the bit depth and sample rate. If you have an audio CD or a DVD, you can then set the sound format.
2] Microphones Tab
Hence, it allows you to configure how microphones work on your PC.
Microphone Effects
This Microphone effects tab offers an option that helps you to suppress the static background noise while recording. Besides, it enables you to decrease the acoustic echo caused by the front speakers. These assist you in recording audio clearly.
Default Format
It permits you to choose the default sound quality format.
How To Fix Realtek Hd Audio Manager Missing Issue?
Way 1. Uninstall the Realtek HD Audio driver
In case you are unable to restart the Realtek HD Audio driver, then the problem may be in your driver. It means that driver is not suitable for your computer. To fix Realtek HD Audio Manager missing, you have to uninstall the driver first.
Step 1: First, you have to tap on the Windows key + X shortcut. As soon as you click on this, it will help you to launch the quick access menu. It is available in the lower-left corner of the display.
Step 2: When you get to see the quick access menu, you need to tap on the Device Manager.
Step 3: After that, you need to go to the “Device Manager” menu. Then, you need to expand the “Sound, Video and Game Controllers” part.
Step 4: Now, your job is to right-click on the Realtek High Definition Audio. After that, you have to choose the uninstall option.
Step 5: Finally, what you need to do is check the “Remove the driver for this software” option. And then, tap on the “OK” button. You need to do it to continue the installation process.
Way 2. Download the Realtek HD Audio Driver Windows 10 Manually
You can visit realtek.com to check whether the software is available or not. If it is available, then download the software. In case you couldn’t get it, then find the high-definition audio codecs. It is available on realtek.com/en/downloads. You can face the Realtek HD audio manager’s missing issue due to broken or incorrectly configured Realtek audio drivers.
When you complete the process of downloading the Realtek HD audio manager, you have to double-click on the installation file (A few websites permit the users to free download Realtek HD audio manager). And then, you need to follow all the steps to complete the installation method. After that, you need to restart your device. It will help to come to the effect of an installed audio driver.
Way 3. Enable startup of Realtek HD Audio Manager Windows 10 Task Manager
Now, you need to enable the startup in Task Manager. By doing that, you easily restore the icon to the system tray.
Step 1: First, you need to use the shortcut keys Ctrl + Shift + Esc. It will help you to open the Task Manager.
Step 2: Then, you need to choose the Startup tab.
Step 3: In case the Realtek HD Audio Manager is not in enable mode, then what you need to do is to right-click on the option. And then, choose the Enable mode.
After that, your job is to restart your computer. And then, log in to the Windows 10 version.
Way 4. Reinstall Realtek HD Audio Driver for Windows 10
You can face the Realtek HD Audio Manager missing issue for broken or incorrectly configured Realtek audio drivers also. However, due to this, you can face sound-related problems also. For example, no sound after completing the Windows 10 updating process, different types of static sound in headphones, sound delay issues in Bluetooth speakers, etc.
Driver Talent is beneficial in this case. It helps you to reinstall the exact Realtek audio driver. Now, you can get the Realtek High Definition Audio Manager in the system tray with its help.
Driver Talent is intelligent software. Here, you can get various versions of official Realtek audio drivers. You have to choose such a Realtek HD Audio driver that is compatible with your Windows 10 version. You can use the button “Download Now” to install the Realtek Hd Audio Manager Windows 10 64-bit.
Steps:
Step 1. First of all, you need to scan Windows 10 to check which one is the Faulty Audio Driver. Then, what you have to do is to launch the Driver Talent. And then, tap on the Scan button. It helps you to detect all corrupted, outdated, or incompatible drivers.
Step 2. Now, your job is to undergo the re-installation process of this Driver. After that, you have to navigate to the driver. And then, choose that one from the drop-down menu that fits the most. It also allows you to select a new or stable driver. Next, you have to tap on the reinstall button. As soon as you click on it, Driver Talent will download automatically. Then, you need to install the driver.
Step 3. In this step, what you need to do is to reboot your computer. By doing this, you can get the Realtek HD Audio Manager Windows 10 64-bit icon. After completing the installation process of the driver, you need to go for a restart. You should make a system restore point. Or you can back-up the drivers with Driver Talent. These need to be done before making any system changes on Windows 10. It plays a vital role in terms of protecting computer data. Besides, it can assist you in restoring the system and the drivers.
Way 5. Bring Realtek HD Audio Manager Icon Back via Windows 10 Control Panel
If you find the Realtek HD Audio Manager missing on Windows 10, you need to go to the Control Panel. It will help you to launch the Realtek HD Audio Manager on the Windows 10 version. Here, we have given the process that you can follow to bring the icon back.
Step 1. First of all, you need to open the control panel on Windows 10 on your computer.
Step 2. Now, you can change the View of the icons to small or large.
Step 3. Then, your job is to navigate to the Audio Manager. And then, tap on it.
Step 4. After that, you have to tap on the “i” icon. You can get it available above the OK button that you can find in the bottom right corner.
Step 5. Next, you have to check the Display icon. It is available in the notification area option.
Step 6. Now, what you have to do is to tap on the OK button. As soon as you click on it, you will see the Audio Manager icon on the taskbar. It allows you to adjust the sound settings as you have done before.
Where to find Realtek HD Audio Manager-
If you have already installed the driver, then it will come to your computer automatically. You can check it in the Control Panel.
In case you are unable to find it in the control panel, then check the file explorer.
To do this, you need to open File Explorer first. Then, you need to go to C:Program FilesRealtekAudioHDA.
After that, you have to search for the exe. It will be available in the “File Explorer” window.
Next, what you have to do is click two times to open the Realtek HD Audio Manager.
If you still can’t find the Realtek Audio Manager, you need to reinstall Realtek audio manager by updating your Realtek HD audio driver.
How to Reinstall Realtek HD Audio Manager
First, you need to update the Realtek HD audio driver. It helps you to reinstall the Realtek HD Audio manager. Here, you can get two procedures that will help you to download and update them.
Manual Process:
If you update the drivers manually, then you must require enough computer skills. In this process, you have to find the proper driver online. Then, you need to download it and go for the installation process step-by-step.
In this process, you need to download the driver first.
- And then, you need to install it.
- Now, what you have to do is to go to the Realtek website. And then, you have to search for the driver that can suit the version of your system.
- After finding the exact driver for your system, you need to click two times on the downloaded file.
- Now, your task is only to follow the on-screen instructions. It will help you to install the driver.
Although you can go for the automatic process, let’s check out this method.
Automatic Process:
This procedure is preferable to most people. It is a quick and easy process to do. You can complete the whole process in only a couple of mouse clicks. It is easy for those who are not so expert in using a computer.
The method is perfect for those who don’t have enough time, patience, or computer skills. Through this process, you will be able to update the drivers automatically. Driver Easy can recognize the system automatically. And then, it helps to find the correct drivers for it.
You can easily update the audio drivers. The FREE or the Pro version of Driver will help you to do so. When you use the Pro version, you only need to click two times.
- First, what you need to do is to download the Driver. And then, you need to install it with ease.
- After that, you have to run the Driver Easy. And then, tap on the ‘Scan Now’ option. When you click on it, the driver will scan the computer. Next, it will detect the issues of your driver.
- Now, you need to tap on the Update button. This option is available beside the flagged Realtek audio driver. It will help you to download the right version of the drive automatically. After that, you need to install it by following the manual process. The FREE version allows you to do it.
However, you can tap on the Update All option. By doing this, you can both download and install the right version at a time. Although clicking on the option “update all,” you can install correct versions of all drivers automatically that are not available or need to be updated in your system. But for this, you need to take the help of the Pro version.
Scan Windows for a Faulty Driver
If you want to scan windows for faulty drivers, then follow the process. We have given the process for checking for Corrupt Drivers.
- First of all, you need to click on the Windows logo. And then, you need the total on the “R” keys again and again. By doing that, you can get to see the “Run” dialog box.
- Next, you have to type the “devmgmt.msc”. But remember one thing that you must not put any quotation marks in the dialog box. After that, you have to tap on the “Enter” option. When you will do it, this will launch the “Device Manager” on your system.
- Now, your job is to find any device that contains the superimposed yellow exclamation mark in the list. The list contains all the available drivers. The yellow exclamation means that the computer has no idea how to handle such a device that you have installed due to having no drivers available in the device’s hard drive. It also indicates that your computer can’t handle those devices installed when the driver is corrupted.
- In case you can’t find any driver, then the device drivers for the hardware have been installed properly in the computer.
Steps to Check for Outdated Drivers
- First of all, what you have to do is to choose the “Run” option. You can get it in the Start menu. In the recent versions of Microsoft Windows, you can see the Run option in the “Accessories” folder. It is also available in the Start menu. You can open the ‘Run’ dialog. To do this, you need to press the Windows Key (“Start”) and “R” simultaneously.
- Next, what you have to do is to type the “devmgmt.msc”. You need to type in the “Run” box. After that, you have to tap on the “OK” option. Or you can press the “Enter” option also for opening the Device Manager.
- After that, you need to open the “View” menu in the Device Manager. And then, you have to choose the Devices by Type. It will make a list of files according to the device type. It permits you to determine which device you are viewing.
Further Steps:
- Now, you have to choose the device group. And check the group for outdated drivers. For instance, whether you want to check for a keyboard, you need to double-click on “Keyboards.” It will help you to view the keyboard in a file tree.
- After that, your job is to click on the device which you prefer to check. After that, tap on the “Properties” option. The option is available in the menu. Now, the Properties screen for the device that you have chosen already will open.
- Then, you need to open the “Driver” tab. And then, you have to check for the last date of the driver. If the driver is more than six to eight months old, then you can get a new driver for the device. In this case, you need to tap on the “Update Driver” tab first. And then, you have to choose the “Search Automatically for Updated Driver Software.” It permits Windows to find the latest driver software on the web. In case you see no driver available, then Windows notifies you that your device needs upgrading. But if Windows presents the latest updated version, then you only need to install the latest driver.
Instructions to Find the Missing Drivers:
If you want to find the missing drivers, then follow the instructions.
- First, you have to open the Start menu. It is available at the bottom portion of the screen.
- Now, what you need to do is to go to the menu option. And then, you have to choose the “Control Panel.” You need to select it from the available list that contains programs.
- Hence, a new window will appear in front of you. It enables you to access all the settings on the computer.
- Now, what you have to do is to tap on the “System and Security.” It will help you to access the troubleshooting folder available on your system.
- After that, you have to open the Device Manager. The option is available below the section “System.”
- Next, your job is to select the device, due to which you can’t find the driver from the available list. When you find it, you have to right-click on it. And then, you have to hit the “Update Driver Software.”
- It will consent the computer to find drivers online. And then, you need to install the new driver for any device.
The Process of Fixing the Realtek HD Audio Manager Missing Windows 7
Is Realtek HD audio manager missing windows 7? What to do? Just follow the below-described steps to fix the problem.
- First, you have to right-click on the taskbar. And then, you need to choose the task manager
- After that, what you have to do is to choose the Startup tab.
- Next, you need to right-click on the Realtek HD audio manager windows 7. If it remains in disabled mode, you need to turn it into Enable mode. After that, you have to close the Task Manager. And then, you need to restart your Windows.
MSI Realtek High Definition Audio Driver
This one has a freeware license that is perfect for any PC or laptop having Windows 32 and 64-bit operating systems. You can download this software free of cost.
You can face multiple complex processes happening before playing any type of audio file. Usually, the power lies on the driver. That’s why if you have any RealTek media player, do confirm that you have installed it with the help of drivers. It helps you to avoid any compatibility challenges.
It is one kind of driver which is compatible with audio software functions. The MSI Realtek HD Audio Driver is a tool that allows you to run it on a stubborn Windows Vista operating system also. This one is compatible with Windows XP and other older versions.
Besides, the tool doesn’t require any special knowledge to handle it. Hence, you only need to ensure that you have installed the application as per the guidelines.
Is Realtek HD Audio Manager not Opening? What to Do Then?
Usually, when you install Realtek Audio drivers, the Realtek Audio Manager comes on your device automatically. The audio manager offers you various options to change the sound settings. However, sometimes you are unable to open the Realtek Audio Manager. You can’t find it in the system tray or Control Panel or Task Manager.
In this case, the main culprit is the drivers. When you don’t install drivers properly or find the drivers corrupted, the audio manager can behave like this. Sometimes, an update of a driver or windows also can be the reason behind this issue.
Tips
Windows and Microsoft release a few updates per month. That’s why make sure that you have installed all the latest Windows updates. When you complete the installation process, then reboot your computer. And then check if the issue still exists.
You can follow the process also to do so.
- First, you need to hold the Windows key, and then you need to press R.
- After that, you have to type C:Program FilesRealtekAudioHDA. And then, you need to press the Enter option.
- Next, you have to locate the .exe file. And then, you need to double-click on it.
- When you do that, you can see the Realtek Audio Manager is appearing. Then, you need to only right-click on the exe file. Next, you need to choose the option. Create a shortcut and move it to the desktop.
Method 1: Uninstall and Reinstall the Drivers
This problem mainly occurs due to faulty or corrupted drivers. So, if you uninstall it and then install it again, it can resolve the problem.
- To do it, first, you need to hold the Windows key and then press the “R” button.
- Then, you need to type devmgmt. msc. And press the Enter button.
- Next, you have to click two times on Sound, video, and game controllers after locating it.
- Now, tap on the Realtek high definition audio device.
- At last, you have to choose the Uninstall option. And then, you need to confirm other extra prompts.
When you have installed the driver, tap on the Action from the top menu bar. And then, choose the Scan option for hardware changes. It helps to reinstall the drivers and solve the problem.
Method 2: Repair Realtek Audio Manager
You can solve the problem by repairing the Realtek Audio Manager also from the Control Panel.
- First, you need to hold the Windows key. Next, press the press R key.
- Then, you need to type appwiz.cpl. And press the Enter button.
- You need to type “appwiz.cpl” in the Run dialog. After typing it, your job is to press the Enter button.
- Then, find the Realtek Audio Manager and select it.
- Now, tap on the Repair option. And then, you have to follow the given instructions. In case you don’t get any Repair button, tap on the Uninstall button.
- As soon as you tap on it, you will see a new window is appearing. Here, you will get to see a Repair option.
- When you see it, choose the Repair option. And then, tap on the Next option.
- At last, what you need to do is to follow the extra on-screen instructions.
Method 3: Microsoft Troubleshooters
In terms of fixing Realtek HD Audio Manager missing issues, Microsoft offers troubleshooters. With the help of these troubleshooters, it scans within a couple of minutes. Therefore, you can run these audio and hardware related troubleshooters to check whether they resolve the problem or not.
- First of all, you need to hold the Windows key. And then, you have to press R.
- Next, you need to type control.exe /name.
- And then, press the Enter option.
- Now, you have to choose Hardware and Sound.
- Next, choose the Hardware and Devices.
- After that, your job is to tap on the ‘Advanced’ option.
- Then, you have to check the ‘Apply repairs automatically’ option.
- After that, you have to tap on the Next option. And then, follow the instructions you will see on the screen.
- At last, check if any problem still exists.
Method 4: Update the Drivers
Sometimes, you can solve the Realtek HD Audio Manager missing by downloading the drivers from the Realtek website. That’s why downloading and installing new drivers can be a solution in this case. Follow the steps to update the drivers.
- First, you need to choose the High Definition Audio Codecs (Software) option.
- Then, go to the option, “I accept the above.”
- After that, you have to tap on the Next option.
- At last, you need to download the drivers that suit your Windows version.
- When you complete the downloading process, you need to double-click on it. Then follow the instructions appearing on the screen.
Method 5: Rollback Drivers
If you face this issue, then the problem may be in the latest version of the driver. It is seen multiple times that the bugs cause this kind of problem. In this case, you can roll back to your last version of the driver.
- You have to hold the Windows key first and press the R key.
- Next, type devmgmt.msc. And then, you need to press the Enter button.
- Now, locate the Sound, video, and game controllers and double-click on it.
- Then, you need to double-click on the sound card driver.
- After that, you need to choose the Driver tab. And, keep the tab open.
- Now, tap on the button Roll Back Driver.
- At last, you need to read all the on-screen instructions. And follow it.
But you can’t do anything when the option is greyed out. Then, what you can do is only uninstall the drivers. And, keep the Windows to install drivers automatically. In that case, you need to follow the first method.
Method 6: Install Drivers from Microsoft Update Catalog
This method is beneficial when you are still unable to update the Windows.
- First, you need to tap on the link https://www.catalog.update.microsoft.com/Search.aspx?q=6.0.1.8328. Then, you have to download the version that suits you most. For this, you only need to click the Download button.
- Now, you can see a new window is appearing. You need to tap on the link which you will see in that window. Then, you need to save the file.
- Next, your job is to navigate to the location where you will extract the file’s contents.
- After that, you have to right-click anywhere in the free space. And then, choose the ‘New’ and then the ‘Folder’ option.
- You need to give a name to that folder according to your preferences. Then, you have to press the Enter option.
- Next, right-click on the file that you have downloaded. And then, choose the Extract files.
- After that, you have to tap on the Browse option. And then, you need to choose the contents you prefer.
- Now, you have to tap on the OK button.
- After that, what you have to do is to disconnect from the internet. It is because you don’t need to reinstall the drivers after uninstalling them. You can install the drivers by following a manual process also.
- To do it, you have to hold the Windows key and press the R option first.
- Then, you need to type ncpa.cpl. And then, press the Enter button.
- Next, you need to click on the internet connection. And then, you have to choose the option “Disable or Connect/Disconnect” option.
More Steps
- Now, you have to hold the Windows key and press the R button.
- After that, you have to type devmgmt.msc. And then, press the Enter button to open the Device Manager.
- Next, you have to locate the Sound, video, and game controllers. And, double click on them.
- Now, you have to tap on the Realtek high definition audio device.
- And then, choose the Uninstall option. After that, you need to confirm the extra prompts.
- Now, reboot your system.
- Next, wait for a while to start up again.
- Then, hold the Windows key and press the R button.
- Now, press enters after typing devmgmt.msc.
- Again, you have to locate the video, sound, and game controllers. And then, click two times on it repeatedly.
- Now, tap on the Realtek high definition audio device.
- Choose the Update Driver Software option.
- After that, you need to choose “Browse my computer for driver software.”
- Now, you need to tap on the Browse option. And then, you need to navigate to the folder’s location where the contents of the downloaded driver are available. Choose the folder and tap on the Open option.
- At last, tap on Next. And then, go through the extra instructions available on the screen.
As soon as you install the drivers, you need to restart your system. Then, you can enable the internet.
Frequently Asked Questions:
Q. How do I get my Realtek HD Audio Manager back?
- You can easily restore the icon to the system tray. In this case, you only need to enable the startup in Task Manager.
- Hence, you need to hit the shortcut keys Ctrl + Shift + Esc. These will help you to open the Task Manager.
- After that, you have to choose the Startup tab.
- In case the Realtek HD Audio Manager is in Disable mode, you have to right-click on it. And then, you have to choose the Enable mode.
Q. Do you require Realtek HD Audio Manager on startup?
No, the audio manager is not essential. It is just an extra audio manager. If you want, you can turn it off.
Q. What will you do if you don’t have the Realtek Audio Manager?
If you face the Realtek HD Audio Manager missing issue, you need to uninstall the latest version (v 2.82). Then, you have only two options — you can reinstall a lower version. Or you can reinstall the new version that is available on Realtek’s website.
