


Blog

How to setup and Manage Apple Pay on Your Mac Devices
Nowadays, with you can use this apple pay on iPhone, Apple watch and all the Mac-supported devices as well. Whether it is a newly released Mac Book Air or MacBook Pro or some other mac device you can still use the Apple Pay on those devices.
If you don’t know how to use that, then don’t worry I’ll show you how to set up and manage Apple pay on your Mac Book Air and other Mac Devices as well.
So, let’s get into the post on how to set up and manage Apple pay on your Mac Devices.
How to Setup Apple pay on your Mac:
If you want to know how to set up Apple pay on your Mac device then just follow this process to set up your Apple Pay on MacBook simply.
- Firstly, hover over to the Safari App.
- Then head over to the preferences section in the Safari App.
- Just click on the Privacy Tab.
- After click on the privacy tab, you should search for the Apple Pay option.
- Select the Apple Pay to be simple allow websites to prompt you with the simple payment option.
Until now, we have seen this process of setting Apple Pay for Mac. Now let’s check out how to set up Apple pay on a MacBook Air or on the MacBook Pro.
How to set up Apple pay on your Mac book Air or MacBook Pro devices with Touch Bar:
If you are using the New MacBook Air or MacBook, pro devices then you should face some trouble with the above process. In MacBook Air or MacBook Pro with Touch ID, you should authorize your transactions directly from the keyboard itself. However, before that, you should add your bankcard details such as credit card or debit card to the Apple Pay.
Nevertheless, even for that process, you need to set up Apple Pay at the start so check out this process.
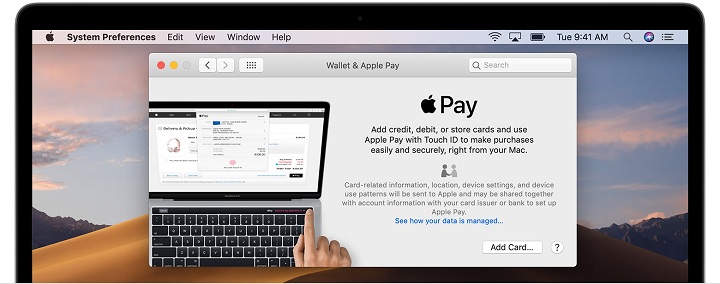
- Just open “System Preferences.”
- Then click on the Wallet & Apple Pay Icon.
- After that, simply click on the plus (+) button and that and add your new debit or credit card details.
- Now, you have to position your card in front of your Mac iSight camera to automatically read the numbers of the card information, or you can even enter your card details manually as well.
- After adding that card information, you should accept the terms and conditions of the card.
- Simply when your bank authorizes your card, then you will be notified that you are all set to use the Apple pay.
- From then you can simply start shopping.
- Meanwhile, if you want to add other cards or delete any cards, you should be following the same process that I have said in this “system preference app.”
Now, if you are using pretty old mac devices means you will be checking out for the options. Don’t worry I got you covered as well. Check below.
How to Setup Apple pay on your older Mac Device:
This process is pretty helpful for older Mac users. If you want to set up your Apple Pay, then you should follow this process.
- Firstly, head over to the settings app.
- Launch the settings app and select the wallet & Apple Pay option.
- After that, Slide on the ON/OFF switch that is right there at the Allow payment options on Mac.
- If it is off, then you should ON that switch.
- After that, you are ready with your Apple Pay.
This is how to set up apple pay on your older Mac Devices.
Now, if you strive to check out how to use your Apple Pay on your Mac devices, then Don’t worry I’ll be covering you that in below.
How to use Apple pay on your Mac:
As you are striving to use the Apple Pay on your Mac, you should know about how to use the Apple Pay. Apple Pay makes your online shopping life much easier. If you are using the new Apple device, then Apple Pay will let you authorize your payments via the touch ID or via the Face ID on your devices like MacBook Air, MacBook Pro, Apple watch and iPhone soon. Previously typing the credit card details now and then was frustrating for users. So, Apple pay helps you to relive from those frustrating situations as you are wondering how to use and pay for an item using Apple Pay on your Mac devices. I’ll explain that in this post.
So, let’s check how to use and manage Apple Pay on your Mac Device.
How to use and manage Apple Pay cards on Mac:
Managing cards on apple pay are somewhat easier when compared to the other payment apps. Once you control your card details, you can automatically use the via touch ID support. Now to manage your card details follow the below process.
- Simply open System Preference
- Then open the wallet & Apple Pay Icon on the System Preference.
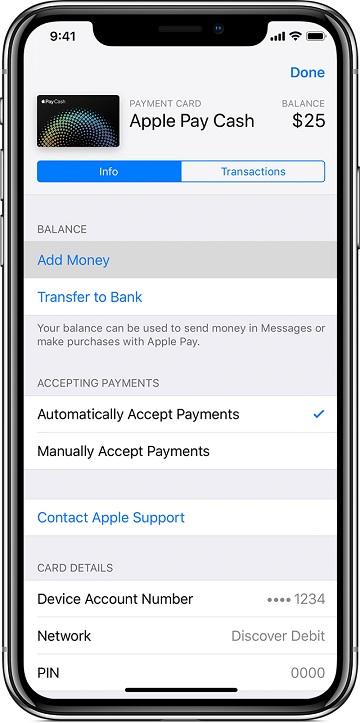
- After that, to view your card’s information – you should select your card from the Right-hand sidebar.
- With that, you can check the device account number, billing address, bank info and all the transactions that are made from the Apple Pay App.
This process works for a newer version, but if you are using a 2014 or below model, then you should manage them through your iPhone. You can check the information and other details from the iPhone.
Now, are you struggling to change the default card? Then don’t worry check the below process.
How to simply change your default card in Mac:
If you want to change your default card in Apple Pay on your Mac Means, you should be following this process. You can easily change your default card but going to the system preference.
- Head over to the System Preferences.
- Then click on the Wallet & Apple Pay option on the system preference.
- Now, right at the bottom of the screen, you can see the drop down menu where you can select the desired card as the default card.
If you want to remove the card, then you can remove that by following this method.
How to remove your card in Apple pay on your Mac:
To simply remove the card you have to go the system preferences and follow these steps.
- Head over to the system preference.
- Select the wallet and apple pay icon.
- Then select the card you wish you removed from the sideboard.
- Merely press the delete button right at the bottom of the sidebar.
- You will get a popup message then confirm that to remove the card successfully.
Now as we are having a glance at everything, let’s check out how to manage your contact and other information on Apple Pay.
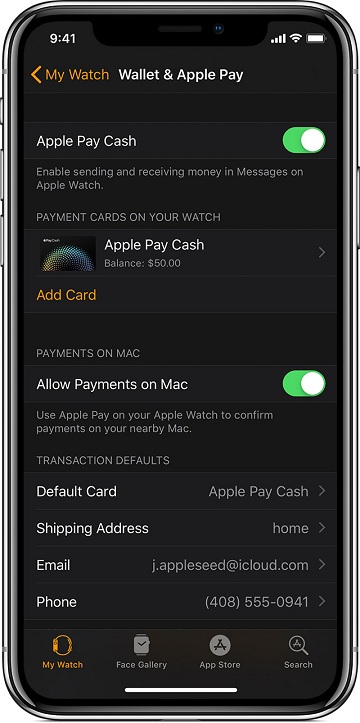
How to manage contact information:
Contact information is always vital for anyone if you want to change your current address then you can do that with the help of settings.
- To manage contact information, you should open system preferences.
- Select the wallet, and Apple Pay icon then choose the contact option.
- You will find this option right at the bottom of the sidebar.
- Now, you can see all the information such as Contact information like email, phone number, and other options.
- If you want to change the contact information, then you should simply modify that and click on update. That’s it.
We have learned about how to set up and manage the Apple pay account. Now let’s see the how to troubleshoot Apple pay.
How to troubleshoot Apple pay on your Mac:
If you are having, any trouble in setting up the Apple Pay or got stuck in payment and other details. Then the simple solution for that is just to try to enter the information again, or you can contact the Apple pay customer support to get your problem resolved.
This is all about how to set up and manage Apple Pay in your Mac. By these steps, you can change any settings in the Apple Pay.
