Blog

How to Transfer Data from Android to iPhone
Got a new iPhone? Are you curious to transfer your old Android phone to your new iPhone? Then, Don’t worry. In this post, you’ll learn how to transfer data from Android to iPhone.
You’ll learn how to move contacts, photos, apps, music, and everything you else which you need to transfer from an Android to your iPhone.
Most of the users always love to transfer the data in a secure way. They really don’t want to lose their data, music, photos, videos, and so on. If you are one of them, then you should get a perfect solution from this post.
The transferring data from Android to iPhone has been more straightforward these days. Thanks to Google, it turns out to be great at this stuff.
Apple has also launched its Android App specifically to make the data transfer process easy for users. If you want to try out “how to transfer data from iPhone to Android,” then check my next post.
Now, let’s check out how to transfer data from Android to iPhone.
How to Transfer Data from Android to iPhone:
In this post, I’m going to cover four ways to transfer data from Android to iPhone. Use the best way you are striving to love to transfer data from Android.
Let’s see
How to use Apple’s Move to IOS Android App to transfer data:

If you’re curious to transfer data from Android to iPhone? Then you can use Apple’s Move to IOS Android App.
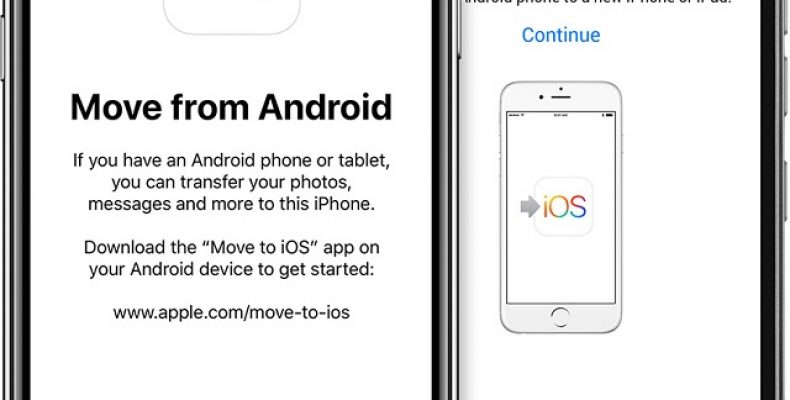
Apple has launched its Move to IOS Android App to wirelessly transfer users data such as ” Contacts, message history, web bookmarks, Camera photos and videos, mail accounts, wallpapers, calendars, DRM free songs and more.” You can use the Move to IOS App in your Android phone to transfer your files to the new iPhone.
While using this app, you’ll also get some advice and tips, as well. The transferring process will help you with the app suggestions, as well. If you’re using free apps on your Android device, then while transferring your files, you will get that app suggestion if the app is available in Apple App Store.
This will help you get back on your feet quickly, but for the paid apps you purchased in your Android, you will have to get them again for the IOS device. This is one of the unfortunate features you have to go through.
Once the transfer process is complete, the Android App will helpfully prompt users to recycle their Android phones quickly. This is mainly for eco-friendly reasons, which most people will not consider.
Now, to transfer the data from Android to your new iPhone. You have to download Move to the IOS app from Google Play Store. Most people say that this method is time-consuming, and some even accuse that it doesn’t work. But, as far as our experience, it may take a longer time, but it will work.

Steps to Transfer Data from Android to iPhone or iPad with Move to iOS app in Android:
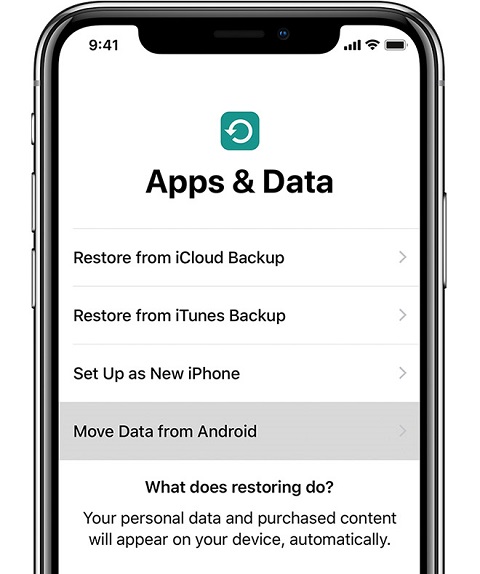
- Firstly, set up your new iPhone or iPad until you reach the “App & Data” screen.
- Then click on the ” Move Data from Android” option.
- In case, if you already have set up your iPhone as new, then you have to go to Settings — General — Reset —- Erase All Content and click settings to restart.
- Now, let’s go to your Android phone & Download the “Move to IOS” App from Google Play Store.
- After the app is Downloaded, Open the Move to IOS App listing.
- Install the App.
- Click on Accept for all permission requests.
- Then open the app after its correctly installed.
- Click on the “Continue” option on both Android and iPhone devices.
- Hit “Agree” and then click on ” Next” on Android phone.
- Now, on your Android device, Enter a 12-digit code that was displayed on your new iPhone or iPad.
Once you enter the code, the Android device will be successfully connected with your iPhone over the Wifi Connection. So, you have to determine what data will be transferred.
Transfer Data from Android to iPhone using Apple ID
Once you’re working on this process, it will ask you whether you want to transfer Google Account information ( You can log in on your new Apple Device), transfer Chrome Bookmarks, Contacts, Photos, Videos, Messages and even “photos and video” which are in your camera roll.
Select all the stuff you want to move over to the iPhone.
Your Android phone will transfer all the selected data over to the new iPhone or iPad. It will place the content into the correct apps. Once after completing it, two devices will be disconnected, and the Android device will be prompted to ” Take your old device to Apple store” to recycle it for free.
After completion, click on continue setting up the iPhone or Continue setting up your iPad on your iPhone or iPad. Carry on with other settings and create a new Apple ID, or you can log into the existing Apple ID.
If everything goes well, you will be prompted to log in to your accounts, which you have transferred from Android Device. That’s it you are ready to go.
Usually, it takes time, depending on how much amount of data you’re transferring from Android devices. In our case, we have transferred 500 MB of files, and it took 11 minutes from Starting to set up our iPhone to the ending process.
Until now, we have seen how to transfer data from Android to iPhone. Now, let’s check out other ways to transfer contacts, music files, and more.
How to transfer contacts from Android to iPhone (Simple Way):
In general, there are two ways of moving contacts from Android to iPhone. I have given both ways in this post; one is transfer contacts using your Google Account.
Quickly transfer contacts from Android to iPhone:
If you’re using Android Device with your Google Account from a long time means you will get your contacts automatically sync to your Google account. If not at all, you will at least have the ones you use most often.
As we’re trying to transfer contacts, firstly take a backup of your Andriod Phone.
Step 1: Andriod:
- Go to the settings page.
- Click “Accounts and Sync” on your Android device.
- Enter your Gmail Account Details and activate synchronization.
- Now, your phone contacts and Google Contacts should currently synchronize.
Step 2: iPhone Process:
- After activating synchronization, unlock your new iPhone.
- Open the Settings app
- Click on “Accounts & Passwords”
- Then add your Gmail Account.
- Now, ensure that contacts are enabled for the account.
- After a few minutes, you will find all your Google Contacts on your iPhone.
This is thus far the more natural process to transfer contacts. Now, let’s take a look at the other process.
Transfer contacts through Google Account (Advanced Way):
We have seen, more natural way now, let’s get into the harder way. To start this process, you have to follow the above steps on your Android or iPhone to go ahead.
- Firstly, Click on the Settings page on your iPhone.
- Click on Accounts & Passwords.
- Select Add Account — Click other.
- Then select Add CardDAV Account.
- Now, fill out your account information in these fields: Server: Type “Google.com.”
- User Name: Enter your Google Email Address.
- Password: Your Google password.
- Description: Enter a description of account such as contacts, personal and so on.
- Click Next at the top of your screen.
- Then ensure your contact option is Set ON.
Once you have completed this process, open your contacts app on your device, then your syncing process will begin automatically between Google and iPhone. Now, Google will have all your contacts.
How to Transfer Photos & Videos from Android to iPhone:
Usually, there are a couple of ways to transfer files. The first way is through the data transferring app.
Data-Transfer Apps Process:
In general, Google has lots of those data transfer apps, but sadly, Apple App Store hasn’t had a vast collection. As you need to have your App installed in both first, you must choose the best apps.
Our recommendation from Data Transfer is through “Photo Sync” or Copy My Data App.
Both of these apps are available on IOS and Android.
- Download the apps on both your Android and iPhone devices.
- Follow the instructions which are given by the app.
- That’s it you will successfully move files from one and other.
This process is simpler than all the other processes. Let’s get into a different method. It’s through iTunes.
Transfer Files using Itunes:
Itunes can be helpful to transfer photos and videos from Android to iPhone. In this process, you have to use a computer with iTunes.,
Firstly, you need to find ” photos and videos on your Android phone — Move them to computer — Sync them to iTunes — and finally sync your new iPhone with Itunes App.
Process:
- Download and install the latest iTunes on Pc or your Mac.
- Choose the photos and videos you want to move.
- Drag all those files in one folder on your computer.
- Create a ” Photos and Videos” Folder to make things easier.
- Now, connect your iPhone to your Mac or PC.
- Open your iTunes and click your iPhone.
- Click on the photos and tap on “Sync photos from.”
- Choose the folder where you saved “Photos and Videos” on your computer.
- Click on Apply, and photos will sync to your iPhone.
SYnc Music:
As you have connected your phone to your system. You can also Sync your music as well with the below steps.
- Choose the music you want to sync and keep that in a folder named “Music.”
- Click on File
- Choose Add folder to library option.
- Now, choose the music you created before and transfer music to the iTunes library.
- Now, click on the device tab
- Click on choose music — Sync music.
- Choose the library or specific files — Click on Apply.
- That’s it; you will transfer data from Android to iPhone with iTunes.
These are the best ways to transfer data from Android to iPhone. If you want to use any alternative method, then you can use Google Photos to access your Android photos and videos on IOS.
Using Google Photos:
- Download Google Photos App on Android.
- Back up your gallery.
- Download Google Photos APp on IOS
- Sign in with your Google account.
- From this account, you can access any photos or videos when you have an active internet connection.
- If you want, you can save all of them in your device by clicking three-dot icons.
That’s it; this is all about how to transfer data from Android to iPhone. Want to learn about more exciting ways, then you have to wait till our next post.


