Blog

How to Change WiFi Channel on Router?
If you stay in a crowded place, you may find your WiFi slowing down or dropping off out of nowhere. When multiple people try to access the same WiFi channels in the area, you can face the issue. If you are willing to know how to change WiFi channel on the router, go through our article.
What is a WiFi Channel?
In most cases, WiFi routers can broadcast data with the help of the 2.4 GHz and 5 GHz frequency bands. Every band is divided into channels that you can use to send and receive data over the WiFi network.
The channels have relations like highways and lanes between the 2.4 GHz and 5 GHz frequency bands. Whether you are willing to select the quickest lanes on either highway, you must choose those with the least traffic.
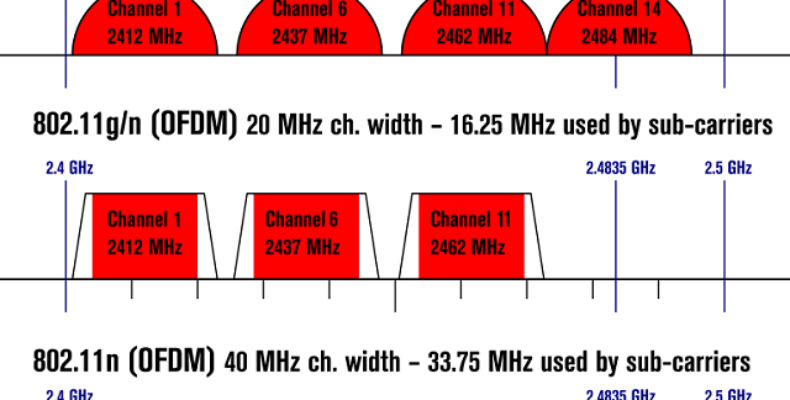
When using the 2.4 GHz band, go with channels like 1, 6, and 11. These are perfect in this case as they don’t overlap with each other. On the flip side, the 5 GHz band offers 24 non-overlapping channels to select.
Multiple routes are available, using the same channel by default. Therefore, whether you don’t change the channel, the router will use the same channels as others use. It can reduce the WiFi signal. The process of changing the WiFi channel on a router is as follows:-
How to Change WiFi Channel on Router:
You can do the method on a PC or a Mac, and besides, you can also do this on a tablet or mobile device. So whether you have a technical friend or a family member, ask to help with the method.
- Your first task is to go to a web browser like Chrome, Firefox, or Safari and open it.
- After that, your job is to type the router’s IP address into the browser’s address bar.
Most routers come with a sticker displaying details like the router’s IP address. Put the password and username to sign in to the router. In most cases, the famous brands of routers come with a username and a password for Admin. An IP address contains four number sequences separated by dots and begins with HTTP:// always. For instance: http://123.456.1.1. Every router has its number.
Various routes can use different terminology to describe the IP address. Whether your router does not come with a sticker, you should check the documentation to get the details. You can contact the manufacturer of the router if necessary.
- Tap on “Enter” after typing in the IP address like http://123.456.1.1. You can see a warning display in the browser in such a case. Tap on the Proceed.
- Now, you should put the username of the router and the password. You can find both the username and password on a sticker on the router. See the documentation if any issue appears in finding the username and password. The documentation is available with the router. If necessary, you can contact the manufacturer of the router.
- Next, your task is to open the Wireless Settings. The name and location can differ depending on the brand. Most famous brands display wireless Settings under Advanced Settings.
You can take help from the router’s manual if necessary, or you can take help from a tech-savvy friend. You can have a 2.4 GHz and a 5 GHz band available, but it relies upon the specific WiFi service. While having two bands, change the channel on both bands. If you want to do so, follow the steps.
- If you find an option as an Auto-Connect setting, you may turn it to OFF. The reason is that you are trying to set a different WiFi channel manually. Auto-Connect is a Wireless Settings option.
- Now, tap on the Channels.
- Try to change the WiFi channel to 1, 6, or 11 because these are the least crowded. Change it to others if you find your router broadcasting on channels 1, 6, or 11.
- Hit the Save or Apply button. As soon as you save the settings, you can reboot. But, first, ensure that you need to reboot it and reconnect to the Ring device.
Use a WiFi Channel Scanner App to Change Channels on Router:
If you are willing to save your energy and time, you can prefer to use WiFi analyzers or scanning apps. The scanning apps let you analyze the channels and ensure that the router can broadcast on a non-interfering channel.
Then, follow the steps to change the WiFi channel.
- If you want to use a WiFi scanner to change the channel, you should launch the app first. Then, choose the network name available on the list of available networks.
- As soon as you find the channel name under the SSID panel, your task is to see the Channels column for checking the channel used by the available WiFi network.
- Please tap on the Details when it displays various frequency bands and available channels. Channels that are occupied the least are the best ones, and you can understand the crowded channel following a graph.
- At last, you need to choose the least-crowded channel and, after that, save the settings.
How to Change Channels on Asus Routers:
- You have to sign in to the router first. After that, your task is to find the Advanced Settings available on the left side, and then you should choose Wireless.
- You should look for the Control Channel drop-down menu and choose a different channel afterward.
- Finally, you should tap on Apply to commit the change.
Change on Linksys Routers:
- First, you should sign in to the router. Then, find the Wireless option functions and choose it.
- Next, you should change the channel of the spots.
- Choose the Apply option to commit the change.
How to Change WiFi Channels on D-Link Routers:
- After signing in to this type of router, you need to choose the Setup option.
- Then, you should choose Wireless Settings.
- Go to the bottom of the display, and then you should choose the Manual Internet Connection Setup option.
- Next, scroll to the new page’s bottom and choose the Manual Wireless Network Setup option.
- You need to uncheck it as soon as you check the Enable Auto Channel Scan box.
- You should choose a channel available in the Wireless Channel drop-down.
- Finally, you should choose the Save Settings option to commit the change.
Change Wifi Channels on NetGear Routers:
- Sign in to the router first to open the Configuration tab.
- Now, your job is to choose the Wireless option.
- Next, find the Channel / Frequency field that is set to Auto. Next, choose a channel that people nearby are not using.
- Finally, choose to Apply option to make the change stick.
Conclusion:
WiFi signals are not stable, and these are lighting fast and can drop significantly at the very next moment. If necessary, you can swap the channel, and it can help you to improve the network’s performance, agility, and speed. We hope that you can now understand how to change WiFi channel.
Frequently Asked Questions:
- Which channel is best for WiFi?
We advise keeping the 2.4 GHz channels to 1, 6, and 11 to get the best results. In these channels, you will not find any overlapping.
- What is a channel in router settings?
WiFi channels indicate smaller bands within WiFi frequency bands that your wireless network can use to send and receive data. You have to consider the frequency band your router uses, and according to the band, you should choose a channel number.
- Which WiFi channel is best for 2.4 GHz frequency?
1, 6, and 11 channels are ideal for the 2.4 GHz band, and it is because these do not overlap.


